
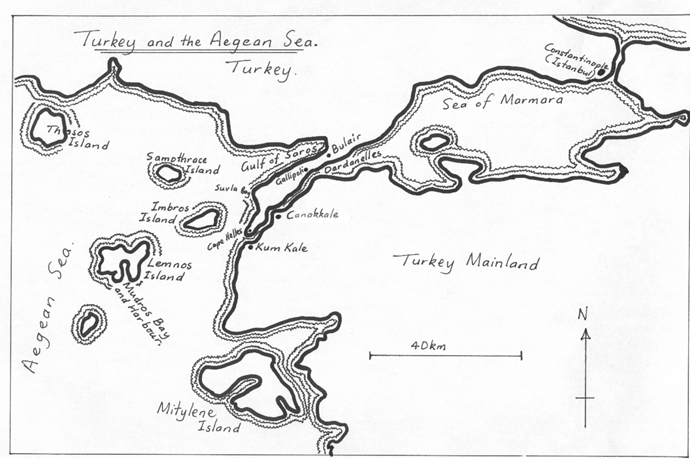
 This map shows the area of Turkey, the Aegean Sea, the Dardanelles Strait, and Sea of Marmara across to Constantinople (today it is called Istanbul). Plan One: Was for the British and French navies to attack the forts at the entrance to the Dardanelles Strait. The ships would then sail through to Constantinople and shell the city. Turkey would panic and withdraw from the war. But the plan failed because the British and French navies could not get through. Ships were sunk and others damaged. The battleships had to withdraw. Plan Two: Was to get the army to land soldiers on the Gallipoli Peninsula and destroy them from behind. The battleships would then sail safely through to Constantinople. The invasion fleet gathered at Mudros Harbour on Lemnos Island in the days and weeks leading up to the attack. On the evening of 24 April the battle fleet set sail. The Australians and New Zealanders were taken to the Gaba Tepe area (just south of Suvla Bay) in the dark and unloaded into smaller ships and boats. They were supposed to land near Gaba Tepe, but by mistake in the dark were landed instead at the place we now call A.N.Z.A.C. Cove. The British were taken to the Cape Helles area and landed at 5 different beaches. The French were taken to the Kum Kale area and landed at 2 different beaches. A group of Royal Navy Division soldiers were landed ashore in the Gulf of Saros, near the village of Bulair. The French and Royal Navy Division attacks were pretend ones only. They were feints, designed to confuse the Turkish and keep men away from the real landing places on the Gallipoli Peninsula. |
||
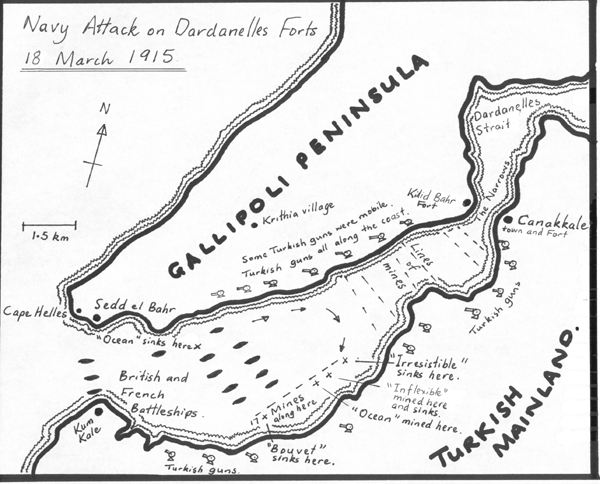 This map shows the attack plan the British and French navies made on the Turkish defences in the Dardanelles Straits on 18 March 1915. The attack failed when the British and French ships began to be sunk by hidden Turkish mines. After this failure by the navies the British decided they needed to put an army ashore to destroy the forts first. The battleships would then try again to go through the Dardanelles Strait. The names of the British and French battleships involved in the attack on the Dardanelles Strait defences on 18 March 1915 were: 1. HMS 'Queen Elizabeth', 2. HMS 'Inflexible', 3. HMS 'Agamemnon', 4. HMS 'Lord Nelson', 5. HMS 'Ocean', 6. HMS 'Irresistible' 7. HMS 'Albion', 8. HMS 'Vengeance', 9. HMS 'Swiftsure', 10. HMS 'Majestic', 11. HMS 'Canopus', 12. HMS 'Cornwallis' 13. 'Suffren', 14. 'Bouvet', 15. 'Gaulois', 16. 'Charlemagne', 17. HMS 'Triumph', 18. HMS 'Prince George' Battleships numbers 13, 14, 15, 16 were French warships. All of the battleships were British. |
||
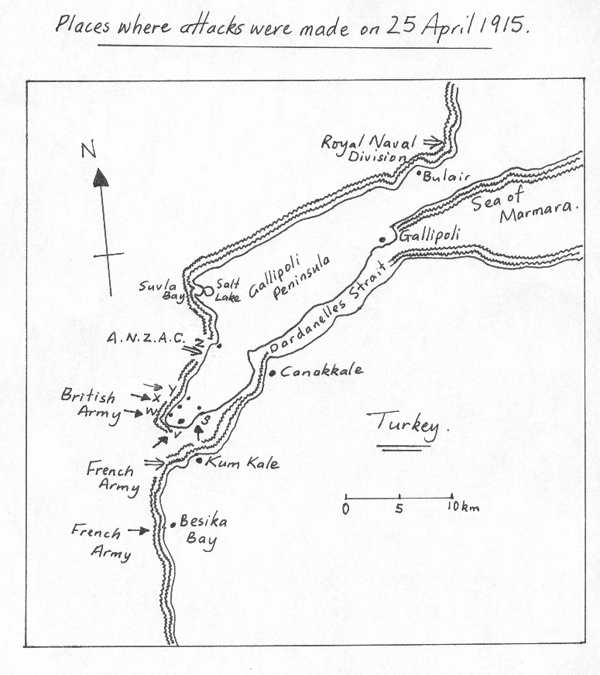 The map above shows the places attacks were made on 25 April 1915. Australia and New Zealand: 'Z' Beach. The first attack was by the Australians at around 4:00 am. It was supposed to be at Brighton Beach, but landed 1.5 km north at A.N.Z.A.C. Cove. The New Zealanders began landing at Anzac Cove around 10:00 am. In the British plan this was called 'Z' Beach. British: 'V' Beach Right beside the fort at Sedd el Bahr. The ship S.S. "River Clyde" was run ashore with 2000 men aboard to try to land them quickly and overwhelm the defences. This also quickly turned into a disaster with many hundreds of men needlessly killed when it was discovered that the navy attack had not destroyed the defences. The Turkish soldiers were still sitting there, hidden and waiting for the British to try to land. 'W' Beach Very strongly resisted by the Turkish defenders. Yet again there were very many casualties. 'Y' Beach Totally successful at first. It was 4 km north up the coast. There was no one there to oppose them. The 2000 men landed sat down and had a cup of tea without getting any defences ready. Neither did they even try to go help the men at 'V' beach. At the time they sat down to have a cup of tea they could have completely destroyed all the Turkish defenders at 'V' beach. Later in the day the Turks arrived and attacked them, causing many casualties through lack of preparation. By the next morning there were almost 700 casualties from the 2000 men. 'X' and 'S' Beaches Easily done with only limited casualties from just a few defenders. However, these men were not able to help landings in other places. Soon the Turkish defenders were attacking them too and trapping the British in the landing places. Royal Naval Division They were to make a 'demonstration' up in the Gulf of Saros. Trying to confuse the Turkish defenders, they went there with ships and soldiers to make a lot of noise and activity. They were quickly withdrawn and used at Cape Helles. French: The French army safely landed and easily captured everything they planned. Over the next few days the French were withdrawn and sent to help the British at Cape Helles. |
||
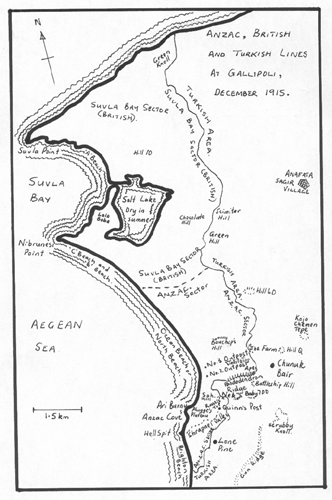 This small map lets you see the Suvla Bay and Anzac sectors together. This only happened after the British landed their soldiers at Suvla Bay on 7 August. The British soldiers were called the New Army, because the main British Army was fighting in France. These were new soldiers specially set out from Britain to fight at Gallipoli. They landed at Suvla Bay at the same time Australia attacked at Lone Pine and New Zealand tried to capture Chunuk Bair. As with all other attacks at Gallipoli, this landing too became a failure due to poor leadership and organisation. The map shows the trench lines as they were when the fighting finally ended in December 1915. The map after this one gives a bigger view of the area. |
||
|
A clearer view of the map above. The whole Anzac sector was so tight it is difficult to put everything clearly into the picture.  |
||
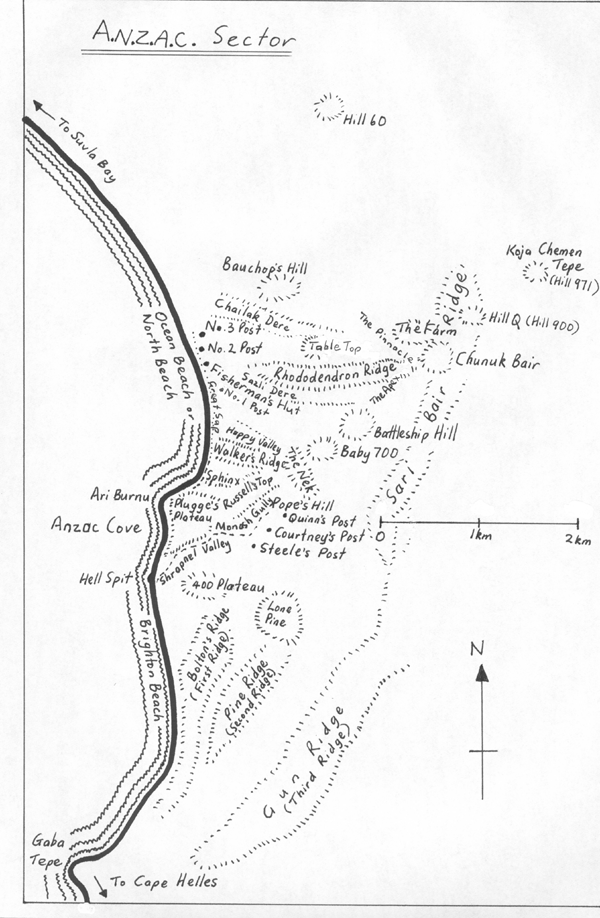 A small map of just the Anzac sector. The name sector was given to the area an army group was controlling. There were many tens of thousands of Australian and New Zealand men squeezed into just this little area, with as many Turkish soldiers squeezed in on their side. Everything was so close together, with the land so steep and rugged, the maps do not properly show how impossible the country was. This was another of the problems the British had in planning the landings. They did not properly understand just how bad the land was they were trying to put an army onto. |
||
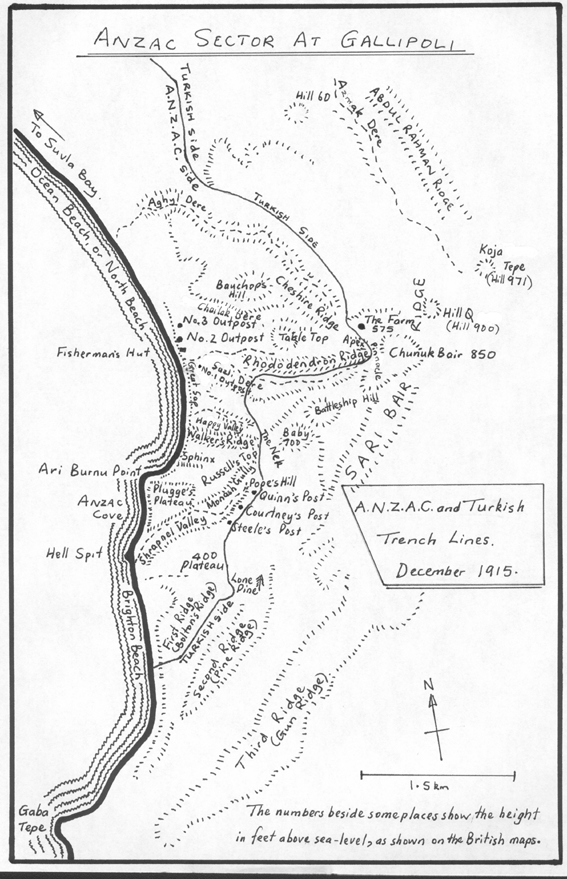 This large map does not show the mad tangle of gullies and dead end ravines across the sector. The amazing courage of men on both the Anzac and Turkish side was the one constant feature of everything that happened at Gallipoli. The men did everything possible and more that the officers asked of them. The soldiers were let down by poor planning and organisation. The trench lines are as they were when the men withdrew in December 1915. |
||
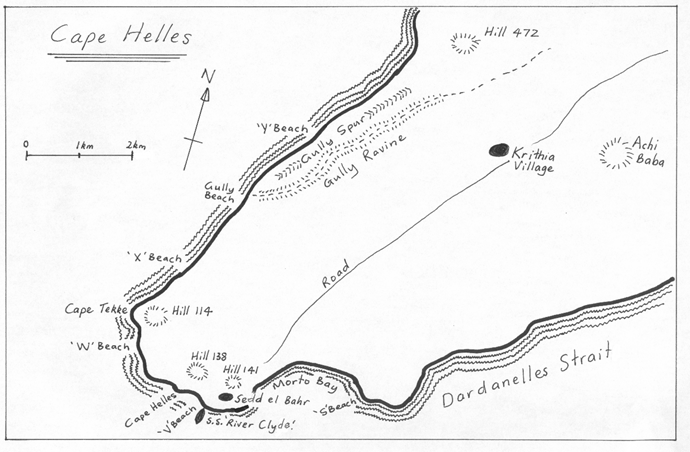 This was the British and French sector. At the beginning, the British generals thought that the Australians and New Zealanders weren't very good soldiers, so they gave the Anzacs the easy bit at Anzac Cove. the British would do the tough bit at Cape Helles. The British soldiers did no better than the Anzacs, even worse, in some places. The village of Krithia and the hill Achi Baba were supposed to be taken on the first day. They were never captured, and in January 1916 the British finally withdrew from Cape Helles too, at last ending the disaster of the Dardanelles. |
||
 Landing at Suvla Bay would help to draw attention away from Chunuk Bair and allow the New Zealanders to capture it. The British New Army would then link up with the Anzacs and cross the Gallipoli Peninsula, cutting off all the Turkish soldiers in the south. But, yet again through poor planning and organising this did not happen. After landing safely on 7 August, the British New Army sat down for a rest for 2 days. Meanwhile the Turkish soldiers got themselves organised and when at last the British did try to move forward across the dry Salt Lake they were slaughtered by hidden guns on Green Hill, Scimitar Hill and other surrounding hills. After dreadful losses the British New Army just had to dig in right across the whole sector,from Kidney Hill in the north, down past Hill 60 in the south. The British eventually withdrew from here on 20 December 1915, the same day the Anzacs left Anzac Cove. |
||