
|
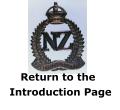
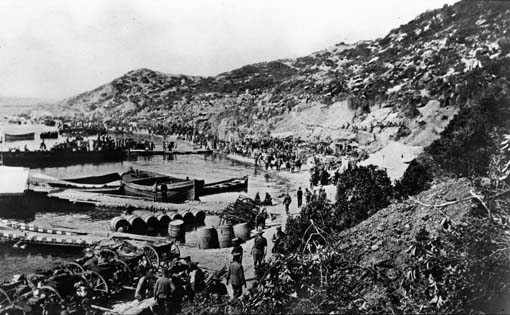
 (Alexander Turnbull Library 16358 1/4) These boats, called cutters, are taking New Zealand soldiers to land at Anzac Cove on 25 April 1915. They were first towed in by small steam boats called pinnaces, then, in the cutters, they rowed the last part of the way to the beach. Anzac Cove is between the large boat on the left and the white boat. Shrapnel Valley is above the white boat. |
|
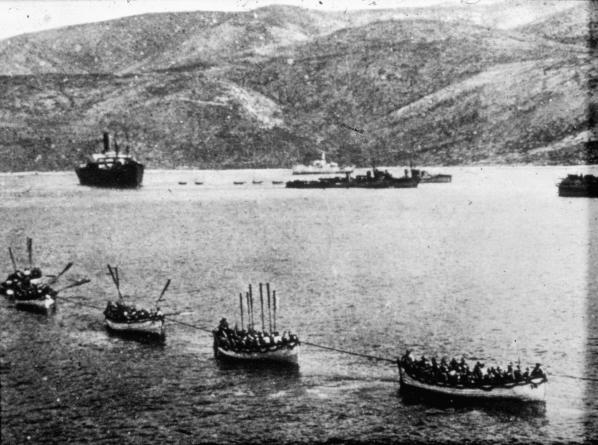
 One of the cutters was rescued in 1919 from the beach at Anzac Cove. Here it is in the Australian War Museum in Canberra. The cutter is made of metal, and the black dots are actually bullet holes. |
||
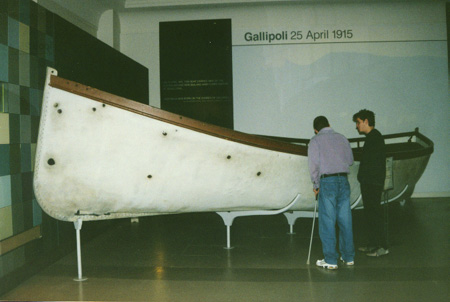
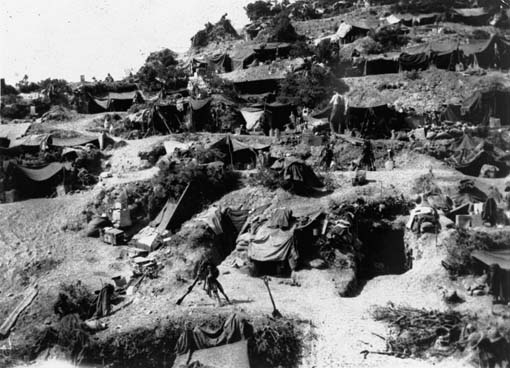
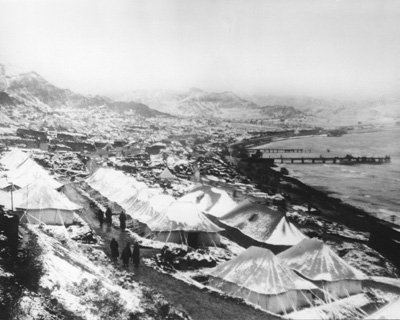
 Once they arrived at the beach in Anzac Cove they found this steep hill to climb. The land was supposed to be flat, but the British Navy made a mistake and landed them here in the wrong spot. Men were soon digging holes in the side of this hill, both for protection from shrapnel and also to sleep in. The flat area on the top of the hill was soon called "Plugge's Plateau", named after the leader of the Auckland Battalion, Colonel Plugge. He made his headquarters up there. |
||
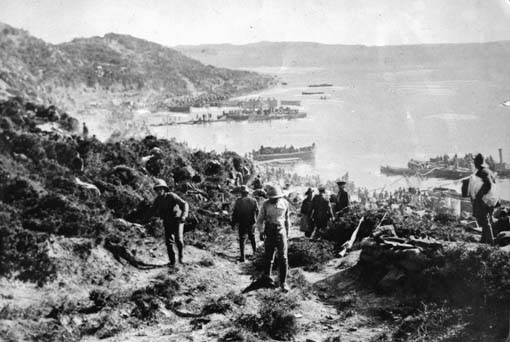
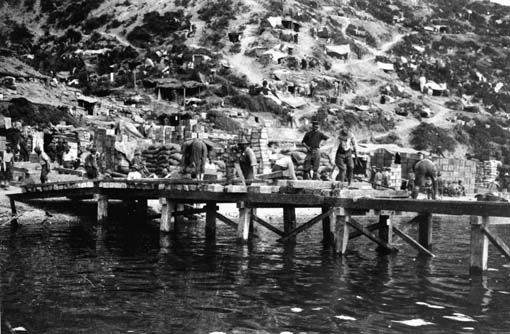
 (Alexander Turnbull Library F32248 1/2) This is what the beach soon looked like. Men and equipment are everywhere. A lot of small landing stages called "piers" were built to speed up the landings. This photo was taken at the southern end of the beach looking northwards. It was taken from nearly the same spot as the photo I took of the dog in the next picture. |
||
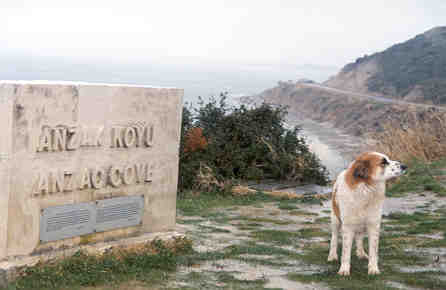 When I visited in January 1999 this dog was living there at Anzac Cove. Our guide said that he had been there for a few years and he lived off food from travellers such as myself. From this spot the tiny beach can be seen quite clearly. I climbed down and walked along it. It is just 700 paces long and 40 paces from the water to the cliff edge. Look at the picture above this one. They are both taken from almost the same spot. |
||
 (Alexander Turnbull Library F66278 1/2) Men and equipment continued to be unloaded, and then had to be carried up the hill. You can see water being pumped ashore from the boat at the pier in the right hand corner. All the water had to be brought by ship from Egypt. This photo was taken at the northern end looking south to where I had photographed the dog. Men are beginning to dig holes, (called "dug-outs") in the side of the hill so they had somewhere to sleep. |
||
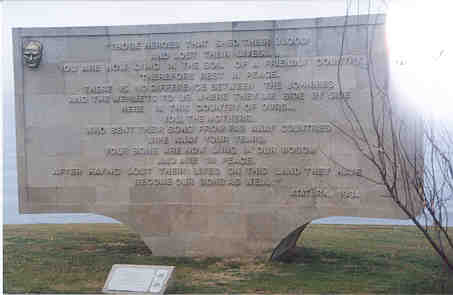 The Turkish leader Mustafa Kemal Ataturk wrote these words in 1934. "Those heroes that shed their blood and lost their lives, You are now lying in the soil of a friendly country. Therefore, rest in peace. There is no difference between the Johnnies and the Mehmets to us, Where they lie side by side in this country of ours. You, the Mothers, who sent their sons from far away countries, wipe away your tears: Your sons are now lying in our bosom, and are in peace. After having lost their lives on this land they have become our sons as well." This memorial wall is at Ari Burnu point, the northern end of Anzac Cove. |
||
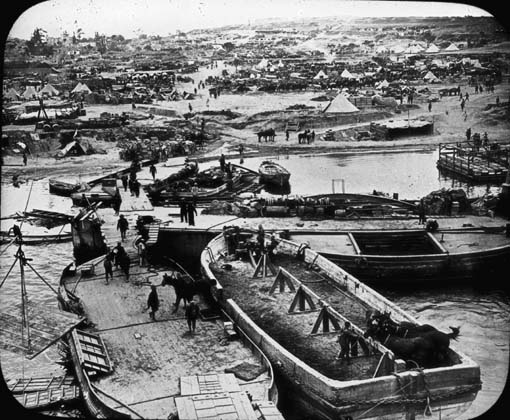
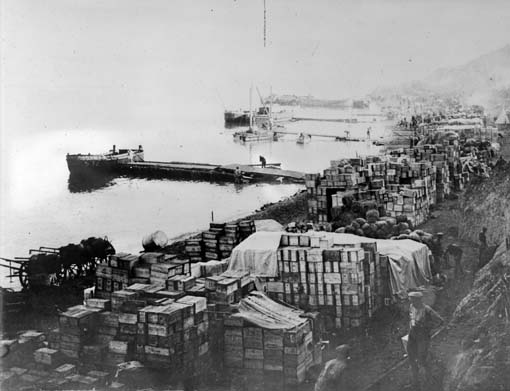 (Alexander Turnbull Library F66281 1/2) After the men had been at Anzac Cove for some months the supplies had begun to build up. But there was nowhere else to put them apart from on the beach. This view looks from the south to the north. The piles of boxes were useful another way, too. The Turks had a large gun which was used to explode shrapnel in the air over the beach. They gave the gun the name "Beachy Bill". By having the boxes piled up high men could get a little bit of shelter from "Beachy Bill". There is a path each side of the boxes so men could quickly try to get out of the way of the shrapnel. |
||
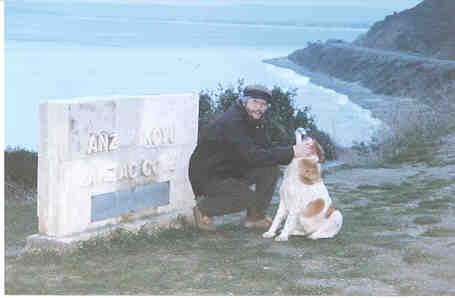 A Turkish guide I had said that the dog was not owned by anyone, and that he had been living there for 2 or 3 years. Travellers such as myself were feeding him. You can see how much he loved the attention I gave him. The beach behind is where the men landed. I walked from one end to the other. It was just 700 paces long, and about 40 paces from the water's edge to the bank. The road was not there in 1915. |
||
 Alexander Turnbull Library (61493 1/2) This was what the hillside looked like from the water as boats came in to land. The pier is still being built. Look on the hillside behind. Men have built dug-outs anywhere they could. They have also hung blankets over the holes to try to create some shade from the very hot sun. |
||
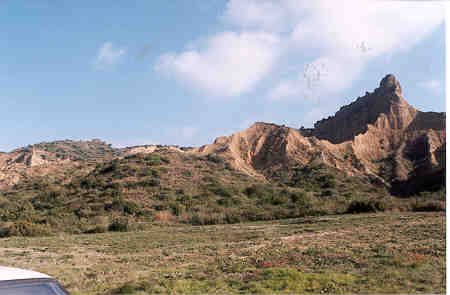
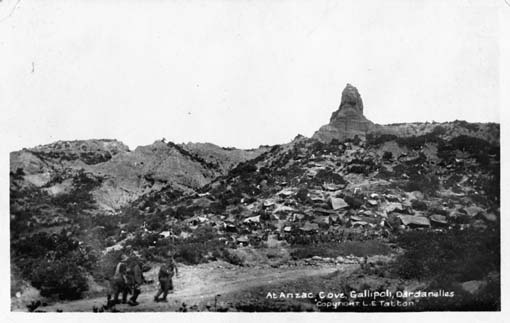 (Alexander Turnbull Library 90367 1/2) The hill the soldiers called "The Sphinx" was right at the centre of activities at Anzac Cove. Men camped in front, and on each side of it. Look at photo 12 below. It is taken from nearly the same spot. In 1915 a sniper was hiding in a small hole up near the top when the Anzacs first arrived. He shot many men over three or four days before he was finally found and killed. |
||
 Look back to the photo above. The men in the picture would have been walking almost straight in front of my camera. I felt very humble thinking of the effort these men had made just to try and stay alive here in 1915. |
||
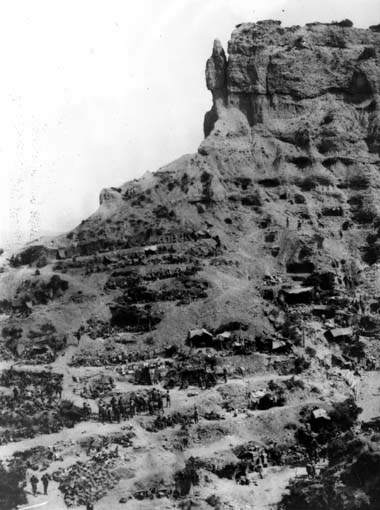 (Alexander Turnbull Library, F 55299) These men are in Rest Gully. The Sphinx is right behind them. Rest Gully had steep sides, but the Turks could not fire directly into it so the men had the chance of safety for a while. The soldiers just dug holes into the sides of the hills and lived in there until they had to go back to the firing line. Imagine what it must have been like when it rained or the wind was blowing hard. |
||
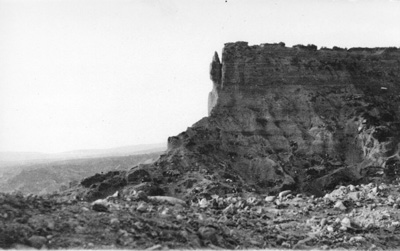 (Q.E.II Army Museum, Waiouru) The Sphinx, looking from the top of Plugge's Plateau. The Wellington Terraces and Rest Gully are just down below the edge of the hill in front. |
||
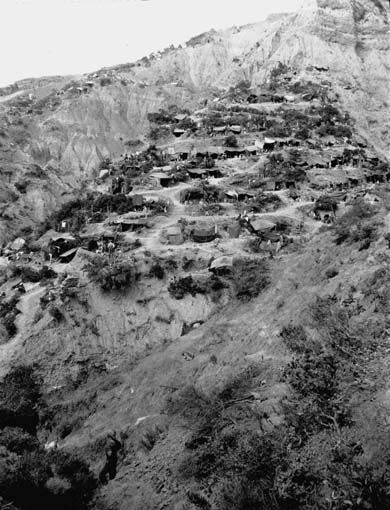 These men are in the Wellington Terraces, just on the other side of The Sphinx from Rest Gully. The area was called the Wellington Terraces as the men from Wellington were often put in here for a rest after being up in the firing line. Walker's Ridge goes up the hill above the Wellington Terraces. A track was built up this ridge leading to Russell's Top. |
||
 (Alexander Turnbull Library, F 61561) The men had to live somewhere when they were not in the firing line. They dug holes in the side of the hill and lived in there. This close-up view of some of the dugouts in the Wellington Terraces shows that there was just room for the men inside so rifles and lots of other gear were left outside. You can see a red-cross first aid box outside one of the dugouts. |
||
 (Alexander Turnbull Library, PAColl 3051, G 9373) Walker's Ridge went from the beach up to Russell's Top. Very quickly a track was built on it so that stores could be moved up to the firing line. This is looking to the north, so the beach was called North Beach and looks away to Suvla Bay in the distance. Two landing cutters are lying washed up on the beach. |
||
 (Alexander Turnbull Library, F 58144) From Russell's Top there was a very good view down to the Sphinx and the beach at Ari Burnu Point. You can see why the Turkish soldiers would have found it easy to shoot the landing Anzacs on 25 April. There are warships just off the coast. These ships were used to fire their guns at the Turkish soldiers. Very often they also hit the Anzacs as the two sides were so close together. |
||
 (Alexander Turnbull Library, PAColl 1663, F 168814) From the beach, the way to the top of Chunuk Bair was up Rhododendron Ridge. The New Zealand soldiers came up this hill as they tried to capture Chunuk Bair in the August attacks. Near the top is a point called The Apex. This was what it looked like after the August attacks with the New Zealand soldiers dug in as they fought back against Turkish counter attacks. |
||
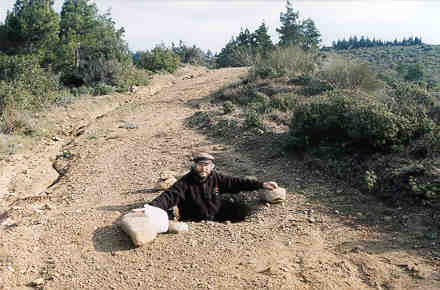 Both sides were constantly trying to dig tunnels underneath each other, put explosives in the tunnel, and then blow up the other side. Halfway up Rhododendron Ridge I found a tunnel where the roof had collapsed in. This picture shows me standing in the tunnel. People have put stones around the hole to warn of the danger. |
||
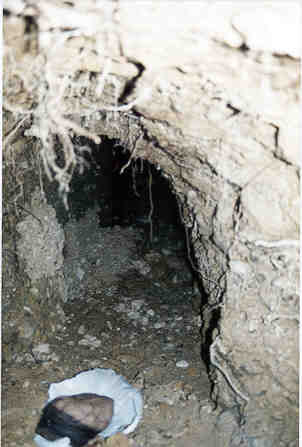 I climbed down into the tunnel and took a photo. There is my hat in the picture to show the scale of the tunnel. It went ahead and then around a corner. It was too dangerous to go any further because of the danger of the roof falling in on me. It was very cool, quiet and dark in there. |
||
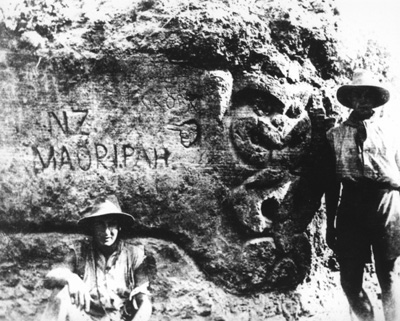 (Q.E.II Army Museum, Waiouru) Down on North Beach, or Ocean Beach, a place had been captured from the Turks. This became known as Outpost No. 1. It was also sometimes called the Maori Pa, as the Maori soldiers were often there. |
||
 (Alexander Turnbull Library, PA11-194, C 10044) You can see a line of mules walking through the middle of the picture. The mules were used to carry men and stores all around the whole Anzac area. |
||
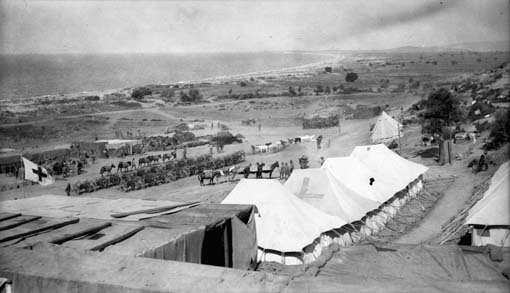
| Down on the beach there were two outposts where the soldiers had captured some Turkish positions. This one was called Outpost Number 2. A small hospital was built here under the shelter of the hills. Some hospital tents have a red cross on them. This helped New Zealand and Australian soldiers to find them, and also to let the Turkish soldiers that these were used to help the wounded and sick. The Turkish soldiers were very good and tried very hard not to attack any hospital tents. | ||
 (Q.E.II Army Museum, Waiouru) The blizzard in November covered everything with snow. Now you are looking south, towards the Sphinx and the Wellington Terraces. |
||
 (Alexander Turnbull Library, F 160132) Once the British did get ashore they made a camp for their soldiers. This is the flat land above the beach, with Seddul Bahir fort at the far end. The Turkish soldiers fought very bravely to stop the British from getting any further inland. The British soldiers were trapped there, just as the Australians and New Zealanders were trapped at Anzac Cove. In May the New Zealand soldiers came here too to try and help the British break out. All the attacks failed with many lives wasted in attacks that failed. |
||
 This is the view the Turkish soldiers had of the landing beach the British called V Beach. The Turkish soldiers were so well hidden the British could not see where the machine guns were firing from. |
||
 (Alexander Turnbull Library, PA11-194, C 10056)
Supplies had to be brought in on the ships. Horses and mules came by boat too. This photo shows horses being unloaded at Cape Helles. The tents and camp are on the flat land above the beach. The next picture shows the boat this photo was taken from, the S. S. "River Clyde". |
||
 (Alexander Turnbull Library, F 160134) To try to get soldiers quickly onto the beach the British used a ship called the S.S. "River Clyde" and loaded it with 2000 men. They then ran the ship aground close to Seddul Bahir fort, hoping that getting many men ashore suddenly would help with their attack. But the Turkish machine guns killed 500 men before they even got to shore. The attack was held up until dark when the rest of the shocked men finally got to land. This picture shows the "River Clyde" still stuck on the beach. Other ships were then tied up to it and a pier was built to help unload stores. The New Zealand soldiers came along this way to help in the May attacks. |
||
 This is the view the Turkish gunners would have had of the British ships coming in to the beach. |
||
 One of the Trenches the Turkish soldiers were hidden in with the machine guns overlooking V Beach. |
||
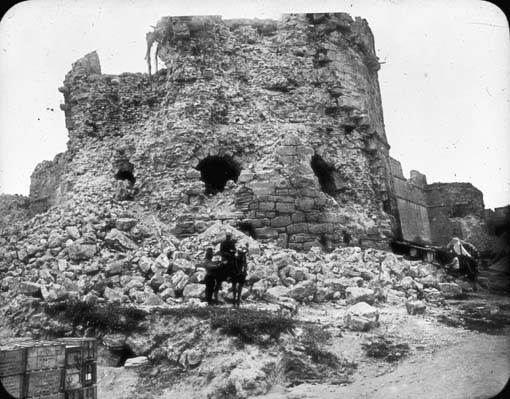
 Here we are looking from inside Seddul Bahir Fort back towards the hill overlooking V Beach. The column on the hill top is the Cape Helles Memorial. The hole in the wall was made during the British Navy attack on 18 March 1915. The Turks had left a large pile of ammunition stored there. A shell from the British hit the ammunition and blew the hole in the wall. |
||
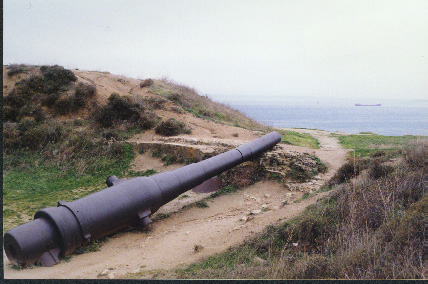
 (Alexander Turnbull Library, PAColl 1657-194, F 77914) Before the men tried to get ashore the British Navy used its huge guns to try and destroy the Turkish guns in the Seddul Bahir fort. They were successful hitting most of the big guns, but not in getting the machine guns hidden in trenches. This picture shows some of the damage the British did to the fort. British soldiers in the picture are using the ruins to store some of their equipment. |
||